How to Protect Excel Data using C# and VB.NET applications
To prevent unauthorized access, unwanted modifications, or even the complete deletion of your Excel worksheets and workbooks, you can limit access to them by setting up a password or encryption.
With GemBox.Spreadsheet, you can quickly secure your worksheets in C#. This .NET library allows you to manipulate protection on several file formats, such as XLSX, XLS, XLSB, and ODS.
In this article, you will learn how to work properly use with Excel data protection, specifically with the following topics:
Install and configure the GemBox.Spreadsheet library
For this article, we propose you create a new .NET project. If you are unfamiliar with Visual Studio or need a reminder, refer to the official tutorial. Also, although GemBox.Spreadsheet supports a wide range of .NET versions (from .NET Framework 4.6.2). We recommend that you use the newest version.
Before you can start converting HTML to PDF, you need to install GemBox.Spreadsheet. The best way to do that is via NuGet Package Manager.
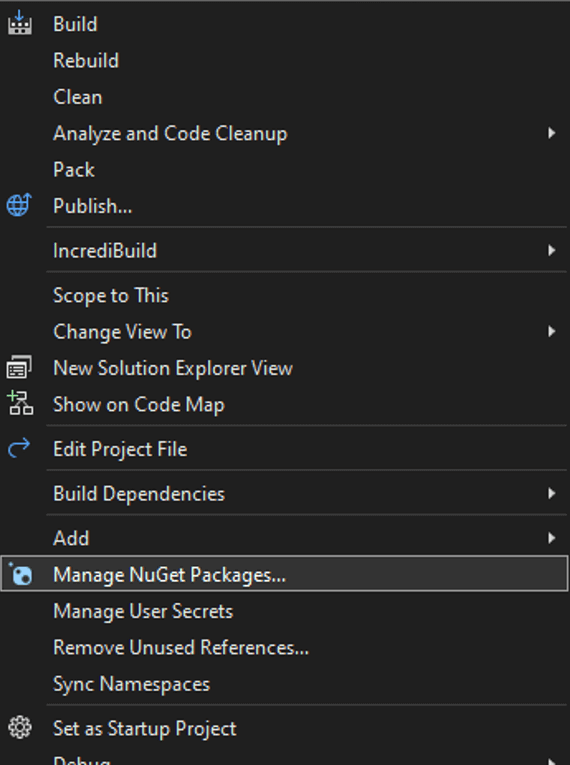
- In the Solution Explorer window, right-click on the solution and select 'Manage NuGet Packages for Solution'.

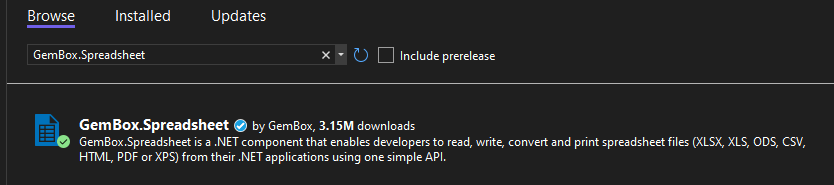
- Search for GemBox.Spreadsheet and click on 'Install'.
As an alternative, you can open the NuGet Package Manager Console (Tools -> NuGet Package Manager -> Package Manager Console) and run the following command:
Install-Package GemBox.Spreadsheet
Now that you have installed the GemBox.Spreadsheet library, all you have to do is make sure you call the SpreadsheetInfo.SetLicense method before using any other member of the library. Since we are working with a console application, we suggest putting it at the beginning of the Main() method.
If you have set everything correctly, your code should look like this:
using GemBox.Spreadsheet;
class Program
{
    static void Main()
    {
        SpreadsheetInfo.SetLicense("FREE-LIMITED-KEY");

        // The code starts here

    }
}
Imports GemBox.Spreadsheet
Module Program
Sub Main(args As String())
'Setting license.
SpreadsheetInfo.SetLicense("FREE-LIMITED-KEY")
End Sub
End ModuleIn this tutorial, we are going to work in the free mode. The free mode allows you to use the library without purchasing a license, but with some limitations. You can read more about working modes and limitations on the Evaluation and Licensing page.
How to protect specific sheets in a worksheet
In certain cases, you may need to protect specific sheets in an Excel file. GemBox.Spreadsheet allows you to protect one or more sheets with a password.
Note that worksheet protection doesn't have any effect on the behavior of GemBox.Spreadsheet. You can modify any protected worksheet just like the unprotected ones. The protection is only enforced by the end-user applications like Microsoft Excel.
In this first tutorial, you will use a Sales history worksheet as a model, which contains all the sales records in 10 years of Company X. This data is crucial for the company and must be protected from editing. On the other hand, other sheets in the same workbook need to be constantly updated, such as the 'Customer information' and the 'New Sales', so protecting the entire workbook is not an option in this case.
To set a password in the Sales records worksheet, just follow these simple steps:
- First, load the workbook and get the worksheet you need to protect.
- Enable the protection by setting the
ExcelWorksheet.Protectedproperty to true. - Set the password using the WorksheetProtection.SetPassword method.
- At the end, save the workbook to a file.
After executing the code above, the Excel sheet will show a notification every time someone tries to modify any of the cells in it. You can see it in the following image.

Worksheet protection settings
With GemBox.Spreadsheet, you can perform several different protection settings with the following properties:
| AllowDeletingColumns | Gets or sets if deleting columns is allowed. |
| AllowDeletingRows | Gets or sets if deleting rows is allowed. |
| AllowEditingObjects | Gets or sets if editing objects is allowed. |
| AllowEditingScenarios | Gets or sets if editing scenarios are allowed. |
| AllowFormattingCells | Gets or sets if formatting cells is allowed. |
| AllowFormattingColumns | Gets or sets if formatting columns is allowed. |
| AllowFormattingRows | Gets or sets if formatting rows is allowed. |
| AllowInsertingColumns | Gets or sets if inserting columns is allowed. |
| AllowInsertingHyperlink | Gets or sets if inserting hyperlinks is allowed. |
| AllowInsertingRows | Gets or sets if inserting rows is allowed. |
| AllowSelectingLockedCells | Gets or sets if selecting locked cells is allowed. Default value is true. |
| AllowSorting | Gets or sets if sorting is allowed. |
| AllowUsingAutoFilter | Gets or sets if using autofilter is allowed. |
| AllowUsingPivotTableReports | Gets or sets if using pivot table reports is allowed. |
As an example, if you want only to allow formatting of cells without being able to edit their content, you can use the following code:
How to unprotect a spreadsheet
Unprotecting a spreadsheet is as simple as the process of protecting it, as you can see in the following code:
- Load the workbook and fetch the worksheet from which you want to remove the protection.
- Then, you will disable the protection in the worksheet by setting the
ExcelWorksheet.Protectedproperty tofalse. - Save the workbook to an XLSX file.
How to protect a workbook
The process of restricting editing of an entire workbook is similar to the process of protecting a worksheet demonstrated above.
Note that as with worksheet protection, workbook protection also doesn't have any effect on the behavior of GemBox.Spreadsheet. You can modify a protected workbook just like the unprotected one. The protection is only enforced by the end-user applications like Microsoft Excel.
Here is the code that shows how to enable the workbook protection:
- Load the Excel file that you want to protect
- Enable workbook and structure protection
- Finally, save the workbook to an Excel file.
Once you execute this code, you will be able to see that it will disable all editing actions in your Excel document, as shown in the following screenshot:

How to unprotect a workbook
To unprotect an Excel workbook, just follow these steps:
- Load the protected workbook with the load method.
- Now, just set the
ExcelFile.Protectedproperty to false. - Save the unprotected workbook to a file.
How to encrypt a workbook
When you choose to encrypt an Excel document, all the data will be unreadable. So, unless you use the password to decrypt it, you won't be able to see its content. Note that encrypted files cannot be opened with GemBox.Spreadsheet without the password, unlike with workbook and worksheet protection.
To encrypt the workbook, follow these 2 steps:
- Load the workbook you want to encrypt.
- Save the workbook to an encrypted XLSX file by setting a password.
When executing the code above, the Excel document will show a prompt requesting a password, as you can see in the following image:

How to decrypt a workbook
To decrypt a workbook, you just need to call the load method and provide the document's password. If the password is correct, the method will return an instance of ExcelFile. If the password is invalid, the method will throw a CryptographicException.
var workbook = ExcelFile.Load("Encrypted.xlsx", new XlsxLoadOptions()
{
    Password = "SuperSecretPassword"
});
Dim workbook = ExcelFile.Load("Encrypted.xlsx", New XlsxLoadOptions() With
{
.Password = "SuperSecretPassword"
})Note that if you want to decrypt a file for good (remove encryption), you must call the Save method without the password. This will save the workbook as an unencrypted file.
In case you don't want to overwrite the original encrypted file, just provide a different name.
Loading an unencrypted XLSX file with a password will throw an exception. To avoid that, you can check if a workbook is encrypted before decrypting it. Here is the code:
if (XlsxLoadOptions.IsEncrypted("Encrypted.xlsx"))
	Console.WriteLine("Workbook is encrypted!");
else
	Console.WriteLine("Workbook is not encrypted.");
If XlsxLoadOptions.IsEncrypted("Encrypted.xlsx") Then
Console.WriteLine("Workbook is encrypted!")
Else
Console.WriteLine("Workbook is not encrypted.")
End IfConclusion
With all the tutorials presented in this article, you learned how to protect your Excel data in C# or VB.NET.
For more information regarding the GemBox.Spreadsheet API, you can read the documentation pages and browse through our examples of other features with runnable code sections.
If you have any questions regarding examples, refer to our forum or submit a ticket to our technical support.