Add Images to Excel Files
The example below illustrates how to add and position images in different ways using C# and VB.NET with GemBox.Spreadsheet.
using GemBox.Spreadsheet;

class Program
{
    static void Main()
    {
        // If using the Professional version, put your serial key below.
        SpreadsheetInfo.SetLicense("FREE-LIMITED-KEY");

        var workbook = new ExcelFile();
        var worksheet = workbook.Worksheets.Add("Images");

        // Add small BMP image with specified rectangle position.
        worksheet.Pictures.Add("%#SmallImage.bmp%", 50, 50, 48, 48, LengthUnit.Pixel);

        // Add large JPG image with specified top-left cell.
        worksheet.Pictures.Add("%#FragonardReader.jpg%", "B9");

        // Add PNG image with specified top-left and bottom-right cells.
        worksheet.Pictures.Add("%#Dices.png%", "J16", "K20");

        // Add GIF image using anchors.
        var picture = worksheet.Pictures.Add("%#Zahnrad.gif%",
            new AnchorCell(worksheet.Columns[9], worksheet.Rows[21], 100000, 100000),
            new AnchorCell(worksheet.Columns[10], worksheet.Rows[23], 50000, 50000));

        // Set picture's position mode.
        picture.Position.Mode = PositioningMode.Move;

        // Add SVG image with specified top-left cell and size.
        picture = worksheet.Pictures.Add("%#Graphics1.svg%", "J9", 250, 100, LengthUnit.Pixel);

        // Set picture's metadata.
        picture.Metadata.Name = "SVG Image";

        workbook.Save("Images.%OutputFileType%");
    }
}
Imports GemBox.Spreadsheet

Module Program

    Sub Main()

        ' If using the Professional version, put your serial key below.
        SpreadsheetInfo.SetLicense("FREE-LIMITED-KEY")

        Dim workbook = New ExcelFile
        Dim worksheet = workbook.Worksheets.Add("Images")

        ' Add small BMP image with specified rectangle position.
        worksheet.Pictures.Add("%#SmallImage.bmp%", 50, 50, 48, 48, LengthUnit.Pixel)

        ' Add large JPG image with specified top-left cell.
        worksheet.Pictures.Add("%#FragonardReader.jpg%", "B9")

        ' Add PNG image with specified top-left and bottom-right cells.
        worksheet.Pictures.Add("%#Dices.png%", "J16", "K20")

        ' Add GIF image using anchors.
        Dim picture = worksheet.Pictures.Add("%#Zahnrad.gif%",
            New AnchorCell(worksheet.Columns(9), worksheet.Rows(21), 100000, 100000),
            New AnchorCell(worksheet.Columns(10), worksheet.Rows(23), 50000, 50000))

        ' Set picture's position mode.
        picture.Position.Mode = PositioningMode.Move

        ' Add SVG image with specified top-left cell and size.
        picture = worksheet.Pictures.Add("%#Graphics1.svg%", "J9", 250, 100, LengthUnit.Pixel)

        ' Set picture's metadata.
        picture.Metadata.Name = "SVG Image"

        workbook.Save("Images.%OutputFileType%")

    End Sub
End Module
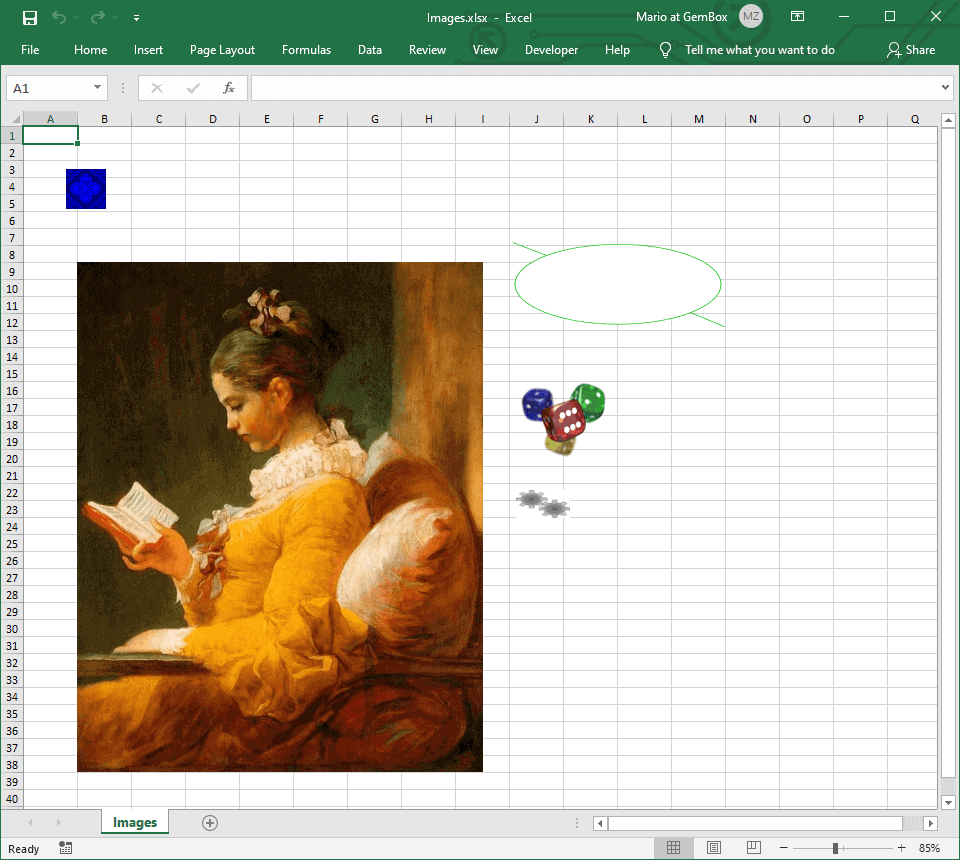
GemBox.Spreadsheet supports all popular image formats, including PNG, JPEG, EXIF, GIF, TIFF, ISO, SVG, EMF, and WMF. However, note that only PNG, JPEG, and EMF images are supported in XLS files (the old binary format).
In PDF files, the SVG, WMF, and EMF images are rendered as vector graphics, resulting in smaller file sizes and better quality than bitmap images (PNG, JPEG, BMP, etc.).
Excel picture in-cell
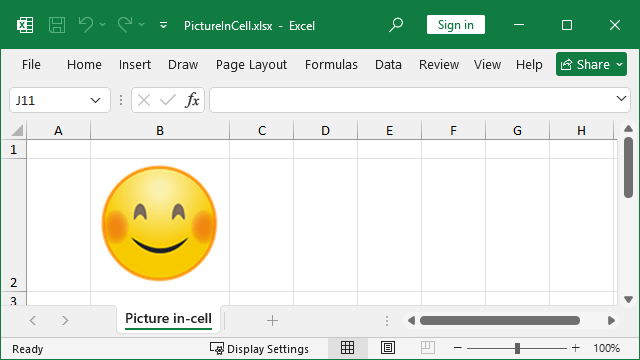
The following example shows how to insert an image into a cell using the RichValue property.
using GemBox.Spreadsheet;
using GemBox.Spreadsheet.RichData;

class Program
{
    static void Main()
    {
        // If using the Professional version, put your serial key below.
        SpreadsheetInfo.SetLicense("FREE-LIMITED-KEY");

        var workbook = new ExcelFile();
        var worksheet = workbook.Worksheets.Add("Picture in-cell");

        worksheet.Columns[1].SetWidth(100, LengthUnit.Point);
        worksheet.Rows[1].SetHeight(100, LengthUnit.Point);

        // Insert an image into a cell.
        worksheet.Cells["B2"].RichValue = new RichPictureValue("%#SmilingFace.png%");

        workbook.Save("PictureInCell.%OutputFileType%");
    }
}
Imports GemBox.Spreadsheet
Imports GemBox.Spreadsheet.RichData

Module Program

    Sub Main()

        ' If using the Professional version, put your serial key below.
        SpreadsheetInfo.SetLicense("FREE-LIMITED-KEY")

        Dim workbook As New ExcelFile()
        Dim worksheet = workbook.Worksheets.Add("Picture in-cell")

        worksheet.Columns(1).SetWidth(100, LengthUnit.Point)
        worksheet.Rows(1).SetHeight(100, LengthUnit.Point)

        ' Insert an image into a cell.
        worksheet.Cells("B2").RichValue = New RichPictureValue("%#SmilingFace.png%")

        workbook.Save("PictureInCell.%OutputFileType%")

    End Sub
End Module
Excel camera function
The following example shows how you can use the Excel camera function in C# and VB.NET using GemBox.Spreadsheet.
using GemBox.Spreadsheet;

class Program
{
    static void Main()
    {
        // If using the Professional version, put your serial key below.
        SpreadsheetInfo.SetLicense("FREE-LIMITED-KEY");

        var workbook = new ExcelFile();
        var worksheet = workbook.Worksheets.Add("Camera");

        // Define some data in a specific range of cells.
        worksheet.Cells[0, 0].Value = 100;
        worksheet.Cells[0, 1].Value = "ABC";
        worksheet.Cells[1, 0].Value = "DEF";
        worksheet.Cells[1, 1].Value = 200;

        // Add image with camera function enabled.
        worksheet.Pictures.Add("=A1:B2", "E6", "F7");

        workbook.Save("CameraTool.%OutputFileType%");
    }
}
Imports GemBox.Spreadsheet

Module Program

    Sub Main()

        ' If using the Professional version, put your serial key below.
        SpreadsheetInfo.SetLicense("FREE-LIMITED-KEY")

        Dim workbook = New ExcelFile()
        Dim worksheet = workbook.Worksheets.Add("Camera")

        ' Define some data in a specific range of cells.
        worksheet.Cells(0, 0).Value = 100
        worksheet.Cells(0, 1).Value = "ABC"
        worksheet.Cells(1, 0).Value = "DEF"
        worksheet.Cells(1, 1).Value = 200

        ' Add image with camera function enabled.
        worksheet.Pictures.Add("=A1:B2", "E6", "F7")

        workbook.Save("CameraTool.%OutputFileType%")

    End Sub
End Module
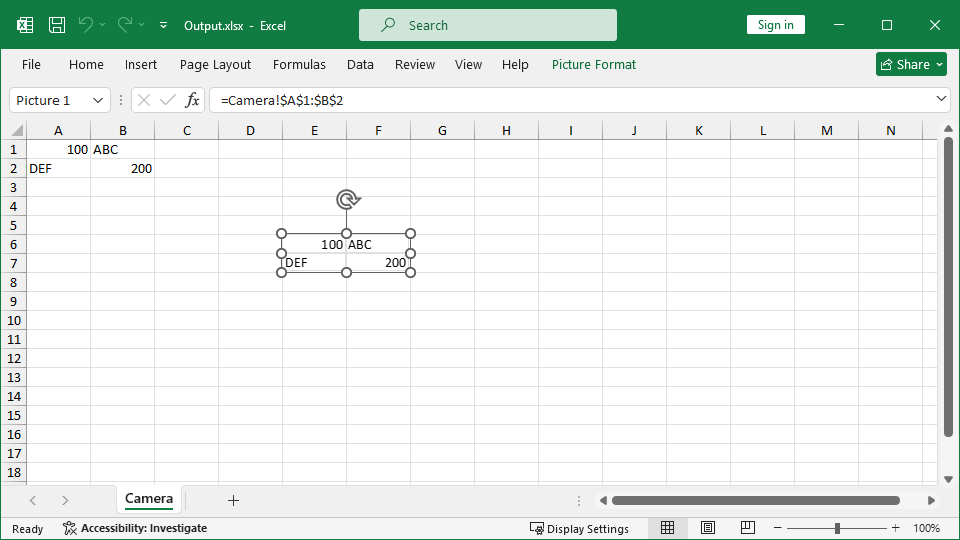
In Excel, the camera function creates an image that will reproduce a live view of a specific range of cells. When the content within the range of cells changes, the image is also updated to show the new data.
GemBox.Spreadsheet supports camera function through CameraRangeFormula property. When defined, the picture will be "linked" to the range specified in formula string. To refresh the underlying image with the range content, you need to call the CalculateCameraRange method.
