Group Rows and Columns
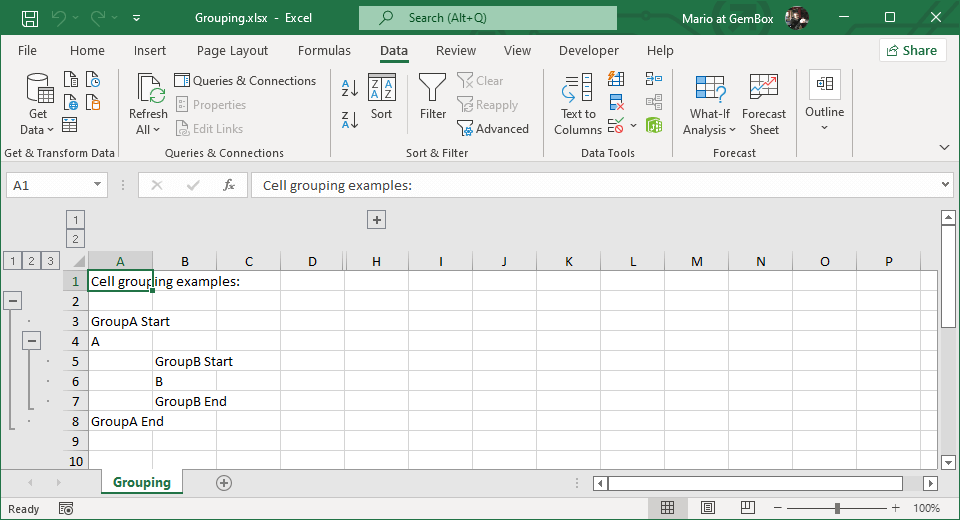
The following example shows how to set grouping on both rows and columns in C# and VB.NET, using GemBox.Spreadsheet.
using GemBox.Spreadsheet;

class Program
{
    static void Main()
    {
        // If using the Professional version, put your serial key below.
        SpreadsheetInfo.SetLicense("FREE-LIMITED-KEY");

        var workbook = new ExcelFile();
        var worksheet = workbook.Worksheets.Add("Grouping");

        worksheet.Cells[0].Value = "Cell grouping examples:";

        // Vertical grouping.
        worksheet.Cells[2, 0].Value = "GroupA Start";
        worksheet.Rows[2].OutlineLevel = 1;
        worksheet.Cells[3, 0].Value = "A";
        worksheet.Rows[3].OutlineLevel = 1;
        worksheet.Cells[4, 1].Value = "GroupB Start";
        worksheet.Rows[4].OutlineLevel = 2;
        worksheet.Cells[5, 1].Value = "B";
        worksheet.Rows[5].OutlineLevel = 2;
        worksheet.Cells[6, 1].Value = "GroupB End";
        worksheet.Rows[6].OutlineLevel = 2;
        worksheet.Cells[7, 0].Value = "GroupA End";
        worksheet.Rows[7].OutlineLevel = 1;
        // Put outline row buttons above groups.
        worksheet.ViewOptions.OutlineRowButtonsBelow = false;

        // Horizontal grouping (collapsed).
        worksheet.Cells["E2"].Value = "Gr.C Start";
        worksheet.Columns["E"].OutlineLevel = 1;
        worksheet.Columns["E"].Hidden = true;
        worksheet.Cells["F2"].Value = "C";
        worksheet.Columns["F"].OutlineLevel = 1;
        worksheet.Columns["F"].Hidden = true;
        worksheet.Cells["G2"].Value = "Gr.C End";
        worksheet.Columns["G"].OutlineLevel = 1;
        worksheet.Columns["G"].Hidden = true;
        worksheet.Columns["H"].Collapsed = true;

        workbook.Save("Grouping.%OutputFileType%");
    }
}
Imports GemBox.Spreadsheet

Module Program

    Sub Main()

        ' If using the Professional version, put your serial key below.
        SpreadsheetInfo.SetLicense("FREE-LIMITED-KEY")

        Dim workbook As New ExcelFile()
        Dim worksheet = workbook.Worksheets.Add("Grouping")

        worksheet.Cells(0).Value = "Cell grouping examples:"

        ' Vertical grouping.
        worksheet.Cells(2, 0).Value = "GroupA Start"
        worksheet.Rows(2).OutlineLevel = 1
        worksheet.Cells(3, 0).Value = "A"
        worksheet.Rows(3).OutlineLevel = 1
        worksheet.Cells(4, 1).Value = "GroupB Start"
        worksheet.Rows(4).OutlineLevel = 2
        worksheet.Cells(5, 1).Value = "B"
        worksheet.Rows(5).OutlineLevel = 2
        worksheet.Cells(6, 1).Value = "GroupB End"
        worksheet.Rows(6).OutlineLevel = 2
        worksheet.Cells(7, 0).Value = "GroupA End"
        worksheet.Rows(7).OutlineLevel = 1
        ' Put outline row buttons above groups.
        worksheet.ViewOptions.OutlineRowButtonsBelow = False

        ' Horizontal grouping (collapsed).
        worksheet.Cells("E2").Value = "Gr.C Start"
        worksheet.Columns("E").OutlineLevel = 1
        worksheet.Columns("E").Hidden = True
        worksheet.Cells("F2").Value = "C"
        worksheet.Columns("F").OutlineLevel = 1
        worksheet.Columns("F").Hidden = True
        worksheet.Cells("G2").Value = "Gr.C End"
        worksheet.Columns("G").OutlineLevel = 1
        worksheet.Columns("G").Hidden = True
        worksheet.Columns("H").Collapsed = True

        workbook.Save("Grouping.%OutputFileType%")
    End Sub
End Module

