Excel comments
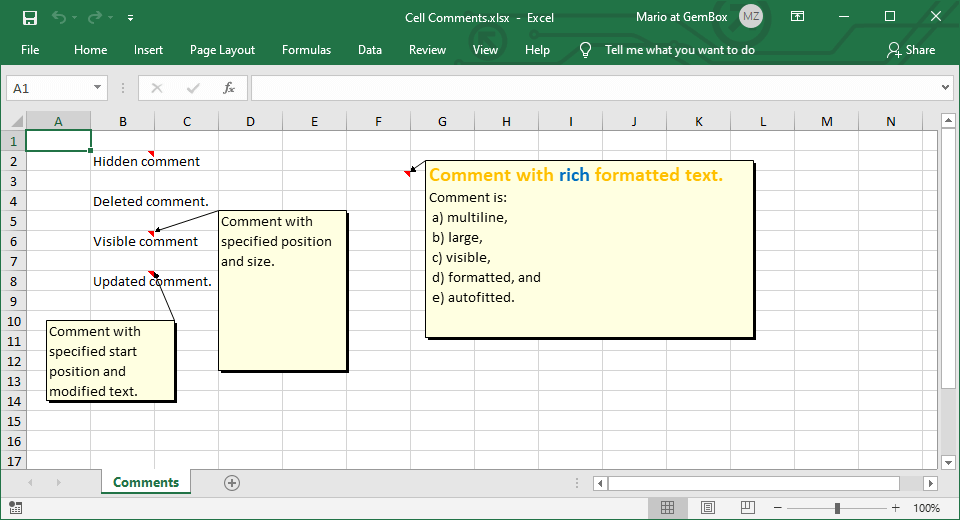
The following C# and VB.NET code examples show how to create, update, and delete comments in Excel using ExcelComment objects with the GemBox.Spreadsheet component.
using GemBox.Spreadsheet;

class Program
{
    static void Main()
    {
        // If using the Professional version, put your serial key below.
        SpreadsheetInfo.SetLicense("FREE-LIMITED-KEY");

        var workbook = new ExcelFile();
        var worksheet = workbook.Worksheets.Add("Comments");

        // Add hidden comments (hover over an indicator to view it).
        ExcelCell cell = worksheet.Cells["B2"];
        cell.Value = "Hidden comment";
        ExcelComment comment = cell.Comment;
        comment.Text = "Comment with hidden text.";

        comment = worksheet.Cells["B4"].Comment;
        comment.Text = "Another comment with hidden text.";

        // Add visible comments.
        cell = worksheet.Cells["B6"];
        cell.Value = "Visible comment";
        comment = cell.Comment;
        comment.Text = "Comment with specified position and size.";
        comment.IsVisible = true;
        comment.TopLeftCell = new AnchorCell(worksheet.Cells["D5"], true);
        comment.BottomRightCell = new AnchorCell(worksheet.Cells["E12"], false);

        comment = worksheet.Cells["B8"].Comment;
        comment.Text = "Comment with specified start position.";
        comment.IsVisible = true;
        comment.TopLeftCell = new AnchorCell(worksheet.Columns["A"], worksheet.Rows["10"], 20, 10, LengthUnit.Pixel);

        // Add visible comment with formatted individual characters.
        comment = worksheet.Cells["F3"].Comment;
        comment.Text = "Comment with rich formatted text.\nComment is:\n a) multiline,\n b) large,\n c) visible, \n d) formatted, and \n e) autofitted.";
        comment.IsVisible = true;
        var characters = comment.GetCharacters(0, 33);
        characters.Font.Color = SpreadsheetColor.FromName(ColorName.Orange);
        characters.Font.Weight = ExcelFont.BoldWeight;
        characters.Font.Size = 300;
        comment.GetCharacters(13, 4).Font.Color = SpreadsheetColor.FromName(ColorName.Blue);
        comment.AutoFit();

        // Read and update comment.
        cell = worksheet.Cells["B8"];
        if (cell.Comment.Exists)
        {
            cell.Comment.Text = cell.Comment.Text.Replace(".", " and modified text.");
            cell.Value = "Updated comment.";
        }

        // Delete comment.
        cell = worksheet.Cells["B4"];
        cell.Comment = null;
        cell.Value = "Deleted comment.";

        workbook.Save("Cell Comments.%OutputFileType%");
    }
}
Imports GemBox.Spreadsheet

Module Program

    Sub Main()

        ' If using the Professional version, put your serial key below.
        SpreadsheetInfo.SetLicense("FREE-LIMITED-KEY")

        Dim workbook As New ExcelFile()
        Dim worksheet = workbook.Worksheets.Add("Comments")

        ' Add hidden comments (hover over an indicator to view it).
        Dim cell As ExcelCell = worksheet.Cells("B2")
        cell.Value = "Hidden comment"
        Dim comment As ExcelComment = cell.Comment
        comment.Text = "Comment with hidden text."

        comment = worksheet.Cells("B4").Comment
        comment.Text = "Another comment with hidden text."

        ' Add visible comments.
        cell = worksheet.Cells("B6")
        cell.Value = "Visible comment"
        comment = cell.Comment
        comment.Text = "Comment with specified position and size."
        comment.IsVisible = True
        comment.TopLeftCell = New AnchorCell(worksheet.Cells("D5"), True)
        comment.BottomRightCell = New AnchorCell(worksheet.Cells("E12"), False)

        comment = worksheet.Cells("B8").Comment
        comment.Text = "Comment with specified start position."
        comment.IsVisible = True
        comment.TopLeftCell = New AnchorCell(worksheet.Columns("A"), worksheet.Rows("10"), 20, 10, LengthUnit.Pixel)

        ' Add visible comment with formatted individual characters.
        comment = worksheet.Cells("F3").Comment
        comment.Text = "Comment with rich formatted text." & vbLf & "Comment is:" & vbLf & " a) multiline," & vbLf & " b) large," & vbLf & " c) visible, " & vbLf & " d) formatted, and " & vbLf & " e) autofitted."
        comment.IsVisible = True
        Dim characters = comment.GetCharacters(0, 33)
        characters.Font.Color = SpreadsheetColor.FromName(ColorName.Orange)
        characters.Font.Weight = ExcelFont.BoldWeight
        characters.Font.Size = 300
        comment.GetCharacters(13, 4).Font.Color = SpreadsheetColor.FromName(ColorName.Blue)
        comment.AutoFit()

        ' Read and update comment.
        cell = worksheet.Cells("B8")
        If cell.Comment.Exists Then
            cell.Comment.Text = cell.Comment.Text.Replace(".", " and modified text.")
            cell.Value = "Updated comment."
        End If

        ' Delete comment.
        cell = worksheet.Cells("B4")
        cell.Comment = Nothing
        cell.Value = "Deleted comment."

        workbook.Save("Cell Comments.%OutputFileType%")

    End Sub
End Module

You can create comments with plain text or richly formatted text. Plain text is supported in XLSX, XLS, ODS, and HTML, while rich formatted text is supported only in XLSX and XLS formats.
To specify the comment location use the ExcelComment.TopLeftCell property. You can also set the comment's size by defining the ExcelComment.BottomRightCell property, or you can use the ExcelComment.AutoFit method and let GemBox.Spreadsheet resize the comment for you.
