How to run Excel Calculations in C# and VB.NET
When developers need to work with worksheets, the fastest solution is to manage all the operations programmatically. That includes doing Excel calculations since you can solve everything easier in just a few lines of code instead of doing everything manually.
In this article, you will learn how to use the GemBox.Spreadsheet API to perform simple mathematical operations and calculate complex functions in your Excel files, using C# and VB.NET.
You can browse through the following covered topics:
- Install and configure the GemBox.Spreadsheet library
- How to read and write Excel cell formulas
- Excel Formula Calculation in C# and VB.NET
- Iterative Calculation in Excel using C# and VB.NET
- Dynamic array formulas and legacy array formulas
- Direct Excel Formula Calculation in C# and VB.NET
- How to use formula utility methods
Install and configure the GemBox.Spreadsheet library
Before you start, you need to install GemBox.Spreadsheet. The best way to do that is to install the NuGet Package by following these instructions:
- Add the GemBox.Spreadsheet component as a package using the following command from the NuGet Package Manager Console:
Install-Package GemBox.Spreadsheet - After installing the GemBox.Spreadsheet library, you must call the ComponentInfo.SetLicense method before using any other member of the library.
ComponentInfo.SetLicense("FREE-LIMITED-KEY");
In this tutorial, by using "FREE-LIMITED-KEY", you will be using GemBox's free mode. This mode allows you to use the library without purchasing a license but with some limitations. If you purchased a license, you can replace "FREE-LIMITED-KEY" with your serial key.
You can check this page for a complete step-by-step guide to installing and setting up GemBox.Spreadsheet in other ways.
How to read and write Excel cell formulas in C# and VB.NET
Follow the next tutorial to learn how to read and write Excel formulas using C# and VB.NET.
- Create a new workbook and a worksheet called “Formulas”.
- Set the cell formula. Note that the formula is set as a string that starts with the '=' character.
- You can use the same property to read the formula. If the formula is not set, it will return 'null'.
- In the end, save the workbook with formulas to an XLSX file using the workbook.Save() method.
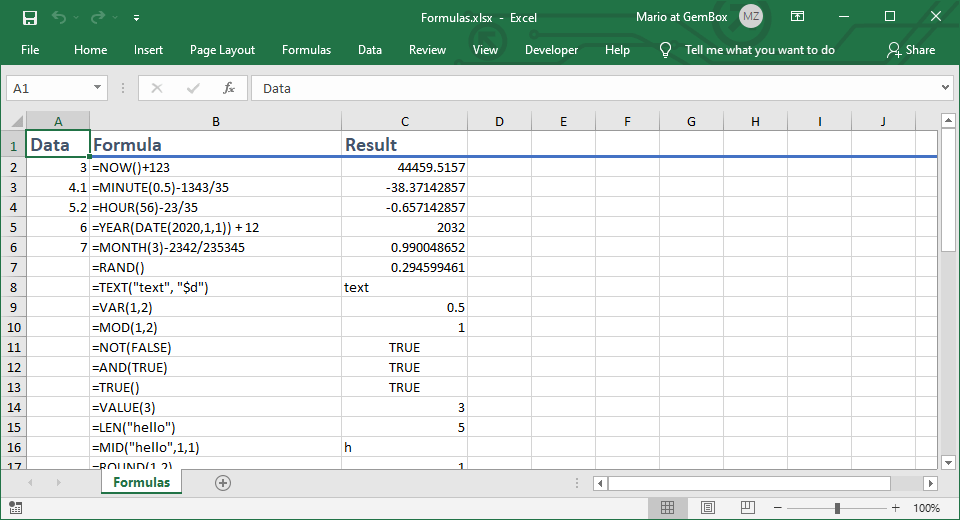
After executing the code above, GemBox.Spreadsheet will create a file that you can open with Excel. Here is a screenshot of it:

Note that when reading and writing Excel formulas using GemBox.Spreadsheet, the level of support depends on the file format:
- In XLSX files, reading and writing of all formulas is supported.
- In XLS files, GemBox.Spreadsheet supports reading and writing of all standard and most advanced formulas.
- In ODS files, reading and writing of all formulas is supported but OpenOffice formulas don't have the same syntax as Excel formulas.
- In CSV files, only reading is supported.
Excel Formula Calculation in C# and VB.NET
GemBox.Spreadsheet supports a wide range of Excel formula functions, including Mathematical, Statistical, Logical, Lookup, Financial, and more. For the complete list, check the Calculation Engine help page, but note that we are continuously adding more based on user feedback.
The built-in calculation engine supports iterative calculations, named range references, external references, array formulas, and other advanced features. You can easily recalculate formulas from the Excel file and those added at runtime using the ExcelCell.Formula property, enabling dynamic computation and updating of formula-based results.
Since formula calculation can be an expensive operation, GemBox.Spreadsheet provides multiple calculation methods, each operating on a different scope:
- ExcelCell.Calculate: This method calculates the formula of a specific cell along with its references, if any.
- ExcelWorksheet.Calculate: By using this method, you can calculate all the cells within a single worksheet.
- ExcelFile.Calculate: Use this method to calculate all the cells in an entire Excel file.
GemBox.Spreadsheet also provides the CalculationOptions.EnableCaching property which can improve the performance of formula calculations in Excel files that have repeated formula expressions that are always evaluated to the same result.
Follow the next steps to calculate Excel cell formula values in C# and VB.NET using GemBox.Spreadsheet.
- Start by creating a new workbook and a worksheet called “FormulaCalculation”.
- Enter some Excel formulas in the A column.
worksheet.Cells["A1"].Formula = "=1 + 1";
worksheet.Cells["A2"].Formula = "=3 * (2 - 8)";
worksheet.Cells["A3"].Formula = "=3 + ABS(A2)";
worksheet.Cells["A4"].Formula = "=A3 > 15";
worksheet.Cells["A5"].Formula = "=IF(A4, \"Hello world\", \"World hello\")";
worksheet.Cells["A6"].Formula = "=A5 & \" example\"";
worksheet.Cells["A7"].Formula = "=CODE(RIGHT(A6))";
worksheet.Cells["A8"].Formula = "=POWER(A7, 3) * 0.45%";
worksheet.Cells["A9"].Formula = "=SIGN(A8)";
worksheet.Cells["A10"].Formula = "=SUM(A1:9)";
worksheet.Cells("A1").Formula = "=1 + 1" worksheet.Cells("A2").Formula = "=3 * (2 - 8)" worksheet.Cells("A3").Formula = "=3 + ABS(A2)" worksheet.Cells("A4").Formula = "=A3 > 15" worksheet.Cells("A5").Formula = "=IF(A4, ""Hello world"", ""World hello"")" worksheet.Cells("A6").Formula = "=A5 & "" example""" worksheet.Cells("A7").Formula = "=CODE(RIGHT(A6))" worksheet.Cells("A8").Formula = "=POWER(A7, 3) * 0.45%" worksheet.Cells("A9").Formula = "=SIGN(A8)" worksheet.Cells("A10").Formula = "=SUM(A1:A9)" - As mentioned before, GemBox.Spreadsheet supports multiple calculation scopes, so you can calculate a single Excel cell…
- … or calculate the whole Excel worksheet, …
- … or a whole Excel file.
- After performing the calculations, you can get the calculated value of a cell via the ExcelCell.Value property.
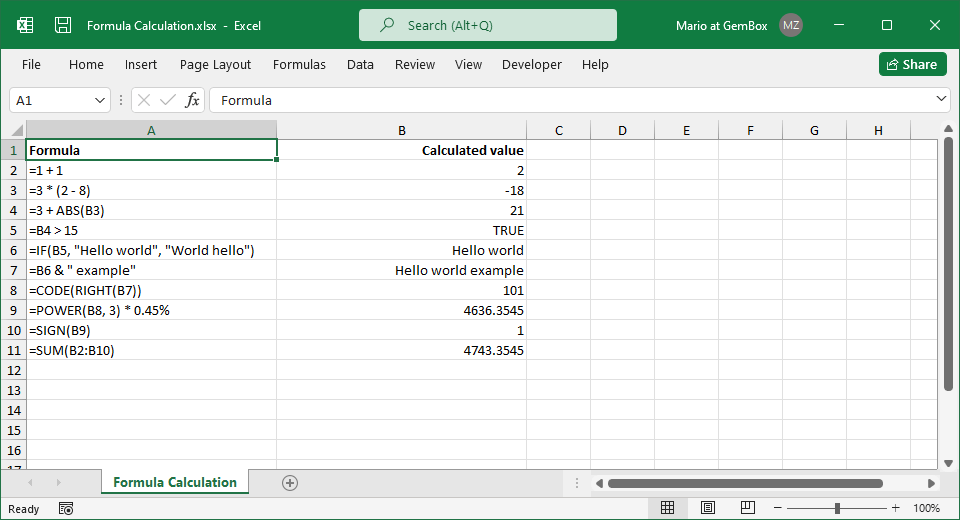
Here is a screenshot of how the results of the calculations will look like after executing the code:

Iterative Calculation in Excel using C# and VB.NET
With GemBox.Spreadsheet you can also calculate cell formulas with circular references.
By default, circular references are not allowed. To enable and use iterative calculation, you'll need to set the CalculationOptions.EnableIterativeCalculation property before calling any of the calculation methods.
Follow this tutorial to perform iterative calculations in your Excel worksheets:
- Create a new workbook.
- Set calculation options.
workbook.CalculationOptions.MaximumIterations = 10;
workbook.CalculationOptions.MaximumChange = 0.05;
workbook.CalculationOptions.EnableIterativeCalculation = true;
workbook.CalculationOptions.MaximumIterations = 10 workbook.CalculationOptions.MaximumChange = 0.05 workbook.CalculationOptions.EnableIterativeCalculation = True - Add a new worksheet.
- To demonstrate the usage of
CalculationOptions.MaximumIterations, create a circular reference between cells A1 and A2, and calculate the worksheet. Once the calculate method is called it will start calculating those cells over and over because they are referencing each other. This process would run forever if the number of iterations wasn't limited. In this example we have set it to 10, so the calculation process will stop after 10 iterations. - Another way to limit the calculation of circular references is to set the
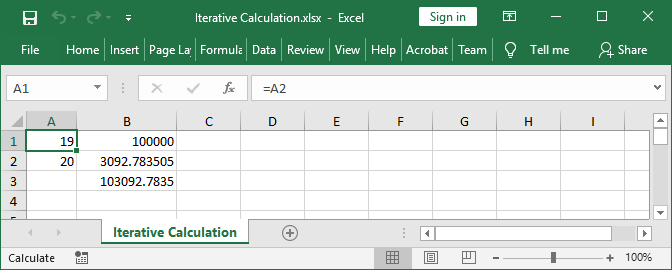
CalculationOptions.MaximumChangevalue. When the difference of a cell value between the previous and current calculation run is less than the MaximumChange, the calculation process will terminate. Here is a simple example code of circular reference limited by MaximumChange.worksheet.Cells["B1"].Value = 100000.0; worksheet.Cells["B2"].Formula = "=B3 * 0.03"; worksheet.Cells["B3"].Formula = "=B1 + B2"; worksheet.Calculate();worksheet.Cells("B1").Value = 100000.0 worksheet.Cells("B2").Formula = "=B3 * 0.03" worksheet.Cells("B3").Formula = "=B1 + B2" worksheet.Calculate()
After executing this code, the result will be as in the following screenshot:

Dynamic array formulas
Dynamic array formulas in Excel can return multiple values that spill into neighboring cells. For instance, the formula "=SQRT(A1:A5)" calculates the square root for each value in the range A1:A5 and outputs the results into the formula cell and the following four rows.
The size of the returned array can vary, even resulting in a single value. However, for such behavior, the formula must be created as a dynamic array formula (or a legacy array formula) to accept and return arrays of values. Otherwise, the formula might be evaluated using the implicit intersection logic, leading to unexpected outcomes in most cases.
When you are working with formulas in Excel, it creates dynamic array formulas automatically behind the scenes. GemBox.Spreadsheet provides the API and calculation support for both dynamic and legacy array formulas, but you need to use different methods for setting dynamic and legacy array formulas. Follow the next steps to learn how to create dynamic and legacy array formulas in Excel using GemBox.Spreadsheet:
- Create a new workbook and a new worksheet.
- Set the value for cells from A1 to A5.
worksheet.Cells["A1"].Value = 4;
worksheet.Cells["A2"].Value = 9;
worksheet.Cells["A3"].Value = 16;
worksheet.Cells["A4"].Value = 25;
worksheet.Cells["A5"].Value = 36;
worksheet.Cells("A1").Value = 4 worksheet.Cells("A2").Value = 9 worksheet.Cells("A3").Value = 16 worksheet.Cells("A4").Value = 25 worksheet.Cells("A5").Value = 36 - Set dynamic array formula using the
ExcelCell.SetDynamicArrayFormulamethod. - Set legacy array formula to C1:C5 range using the
ExcelCell.SetArrayFormulamethod. - You can also set dynamic array formula with a single result.
- And set normal formula which will use the intersection operator.
- Save the workbook.
Dynamic array formulas are fully supported only in Excel 365, Excel 2021, and newer versions. Dynamic array formulas opened in Excel 2019 or older will be shown as legacy array formulas (also known as CSE formulas).The main difference between the legacy array formula and the dynamic array formula is that the range of cells to which the result of the calculation will be written is not determined dynamically, but it needs to be known when setting the formula. Microsoft recommends using dynamic array formulas for newer versions of Excel.
Direct Excel Formula Calculation in C# and VB.NET
With GemBox.Spreadsheet you can also calculate formulas without affecting cell values.
Using the ExcelWorksheet.CalculateFormula method you can perform the calculation for a given formula and retrieve the results as a bidimensional array of objects.
You can use this method for all supported formulas, even the dynamic array formulas. The calculated values will be positioned on the returned array considering its row and column index as it would be if it was being written to cells.
Follow this tutorial to use the ExcelWorksheet.CalculateFormula method in your applications:
- Create a new workbook and a new worksheet.
- Assign values for cells from A1 to C3. Please note that the cells on third column received a formula instead of a value. These formulas will also be resolved during the evaluation process.
worksheet.Cells["A1"].Value = 1;
worksheet.Cells["A2"].Value = 2;
worksheet.Cells["A3"].Value = 3;
worksheet.Cells["B1"].Value = -1;
worksheet.Cells["B2"].Value = -2;
worksheet.Cells["B3"].Value = -3;
worksheet.Cells["C1"].Formula = "=A1";
worksheet.Cells["C2"].Formula = "=A2";
worksheet.Cells["C3"].Formula = "=A3";
worksheet.Cells("A1").Value = 1 worksheet.Cells("A2").Value = 2 worksheet.Cells("A3").Value = 3 worksheet.Cells("B1").Value = -1 worksheet.Cells("B2").Value = -2 worksheet.Cells("B3").Value = -3 worksheet.Cells("C1").Formula = "=A1" worksheet.Cells("C2").Formula = "=A2" worksheet.Cells("C3").Formula = "=A3" - Calculate a formula that returns just one value and print the result to console.
var formula = "=SUM(A1:C3)";
var value = worksheet.CalculateFormula(formula);

Console.WriteLine($"Formula: {formula}");
Console.WriteLine($"Result: {value[0, 0]}");
Dim formula = "=SUM(A1:C3)" Dim value = worksheet.CalculateFormula(formula) Console.WriteLine($"Formula: {formula}") Console.WriteLine($"Result: {value(0, 0)}") - Calculate a formula that returns more than one value (dynamic array formula) and print the results to console.
formula = "=ABS(A1:C3)";
value = worksheet.CalculateFormula(formula);

Console.WriteLine($"Formula: {formula}");
for (int i = 0; i < value.GetLength(0); i++)
    for (int j = 0; j < value.GetLength(1); j++)
        Console.WriteLine($"Result [{i}, {j}]: {value[i, j]}");
formula = "=ABS(A1:C1)" value = worksheet.CalculateFormula(formula) Console.WriteLine($"Formula: {formula}") For i As Integer = 0 To value.GetLength(0) - 1 For j As Integer = 0 To value.GetLength(1) - 1 Console.WriteLine($"Result [{i}, {j}]: {value(i, j)}") Next Next
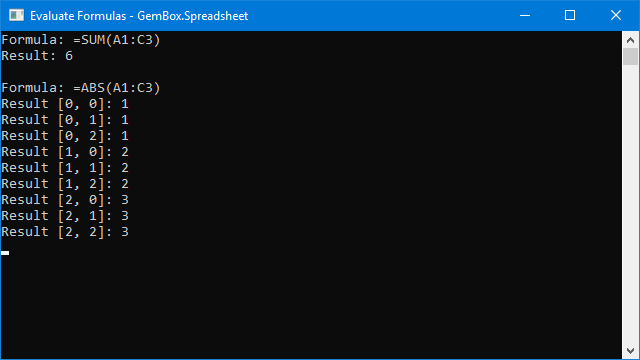
After executing this code, the result will be as in the following screenshot:

How to use formula utility methods
In this tutorial, we will explore GemBox.Spreadsheet utility methods for creating formulas. These techniques will enhance your ability to work with Excel formulas effectively using the component in your C# and VB.NET applications.
- Create a new workbook with a worksheet, and fill it with some values.
var workbook = new ExcelFile();
var worksheet = workbook.Worksheets.Add("Formula Utility Methods");

for (int i = 0; i < 10; i++)
worksheet.Cells[i, 0].Value = i + 1;
Dim workbook As New ExcelFile() Dim worksheet = workbook.Worksheets.Add("Formula Utility Methods") For i = 0 To 9 Step 1 worksheet.Cells(i, 0).Value = i + 1 Next - The first utility method you are going to test is
CellRange.RowColumnToPosition. It converts a row and column index to a position string like "A1", "BN27", etc. - This next code snippet demonstrates the
ExcelRowCollection.RowIndexToNamemethod, which converts row index (0, 1, ...) to row name ("1", "2", ...). There is also theRowNameToIndexmethod, which does the opposite. - The last utility method is
ExcelColumnCollection.ColumnIndexToName, which converts column index (0, 1, ...) to column name ("A", "B", ...). There is also theColumnNameToIndexmethod, which does the opposite..worksheet.Cells["A12"].Formula = String.Format("=SUM(A1:{0}1)", ExcelColumnCollection.ColumnIndexToName(worksheet.Rows[0].AllocatedCells.Count - 1));worksheet.Cells("A12").Formula = String.Format("=SUM(A1:{0}1)", ExcelColumnCollection.ColumnIndexToName(worksheet.Rows(0).AllocatedCells.Count - 1))
Conclusion
With this guide, you have learned all the ways you can use and calculate Excel formulas in C# and VB.NET using the GemBox.Spreadsheet library.
For more information regarding the GemBox.Spreadsheet API, you can take a moment to read the documentation pages and browse through our examples with executable code sections.
If you have any questions regarding the examples, refer to our forum page or submit a ticket to our technical support.