Excel styles and formatting in C# and VB.NET
With the GemBox.Spreadsheet library, you can set various style and format options like alignment, indentation, borders, and font-related properties on Excel rows, columns, and cells in C# and VB.NET.
Table of contents:
- Basic formatting example
- Format the font
- Fill the background
- Align and wrap the content
- Rotate and stack text
- Add and remove borders
- Built-in, custom, and default styles
- Work with colors
- Related formatting topics
- Frequently asked questions
Basic formatting example
The following example applies one piece of formatting at each scope:
- A font on a cell.
- A fill on a row.
- A border on a column.
using GemBox.Spreadsheet;

class Program
{
    static void Main()
    {
        // If using the Professional version, put your serial key below.
        SpreadsheetInfo.SetLicense("FREE-LIMITED-KEY");

        var workbook = new ExcelFile();
        var worksheet = workbook.Worksheets.Add("Styles");

        // Format a single cell: a bold, colored font.
        worksheet.Cells["B2"].Value = "Cell";
        worksheet.Cells["B2"].Style.Font.Weight = ExcelFont.BoldWeight;
        worksheet.Cells["B2"].Style.Font.Color = SpreadsheetColor.FromName(ColorName.Red);

        // Format an entire row: a solid background fill.
        worksheet.Cells["B4"].Value = "Row";
        worksheet.Rows[3].Style.FillPattern.SetSolid(SpreadsheetColor.FromName(ColorName.LightBlue));

        // Format an entire column: a left border.
        worksheet.Cells["D2"].Value = "Column";
        worksheet.Columns[3].Style.Borders.SetBorders(MultipleBorders.Left,
            SpreadsheetColor.FromName(ColorName.Black), LineStyle.Medium);

        workbook.Save("Styles and Formatting.xlsx");
    }
}
Imports GemBox.Spreadsheet

Module Program

    Sub Main()
        ' If using the Professional version, put your serial key below.
        SpreadsheetInfo.SetLicense("FREE-LIMITED-KEY")

        Dim workbook As New ExcelFile()
        Dim worksheet = workbook.Worksheets.Add("Styles")

        ' Format a single cell: a bold, colored font.
        worksheet.Cells("B2").Value = "Cell"
        worksheet.Cells("B2").Style.Font.Weight = ExcelFont.BoldWeight
        worksheet.Cells("B2").Style.Font.Color = SpreadsheetColor.FromName(ColorName.Red)

        ' Format an entire row: a solid background fill.
        worksheet.Cells("B4").Value = "Row"
        worksheet.Rows(3).Style.FillPattern.SetSolid(SpreadsheetColor.FromName(ColorName.LightBlue))

        ' Format an entire column: a left border.
        worksheet.Cells("D2").Value = "Column"
        worksheet.Columns(3).Style.Borders.SetBorders(MultipleBorders.Left, SpreadsheetColor.FromName(ColorName.Black), LineStyle.Medium)

        workbook.Save("Styles and Formatting.xlsx")
    End Sub

End Module

Format the font
You can use the CellStyle.Font property to format the font in a cell, row, or column.
var cell = worksheet.Cells["B2"];
cell.Value = "Formatted text";

cell.Style.Font.Name = "Arial";
cell.Style.Font.Size = 14 * 20; // Size is in twips (1/20 pt), so 14 pt.
cell.Style.Font.Weight = ExcelFont.BoldWeight;
cell.Style.Font.Italic = true;
cell.Style.Font.UnderlineStyle = UnderlineStyle.Single;
cell.Style.Font.Color = SpreadsheetColor.FromName(ColorName.Blue);
cell.Style.Font.Strikeout = true;
Dim cell = worksheet.Cells("B2")
cell.Value = "Formatted text"

cell.Style.Font.Name = "Arial"
cell.Style.Font.Size = 14 * 20 ' Size is in twips (1/20 pt), so 14 pt.
cell.Style.Font.Weight = ExcelFont.BoldWeight
cell.Style.Font.Italic = True
cell.Style.Font.UnderlineStyle = UnderlineStyle.Single
cell.Style.Font.Color = SpreadsheetColor.FromName(ColorName.Blue)
cell.Style.Font.Strikeout = True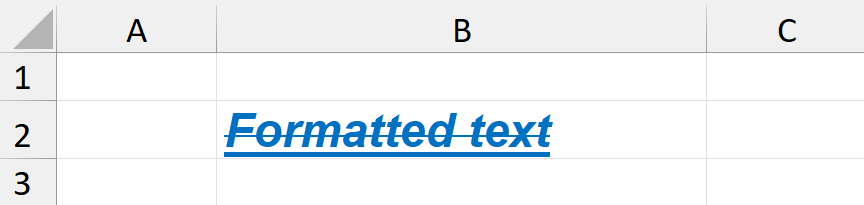
Fill the background
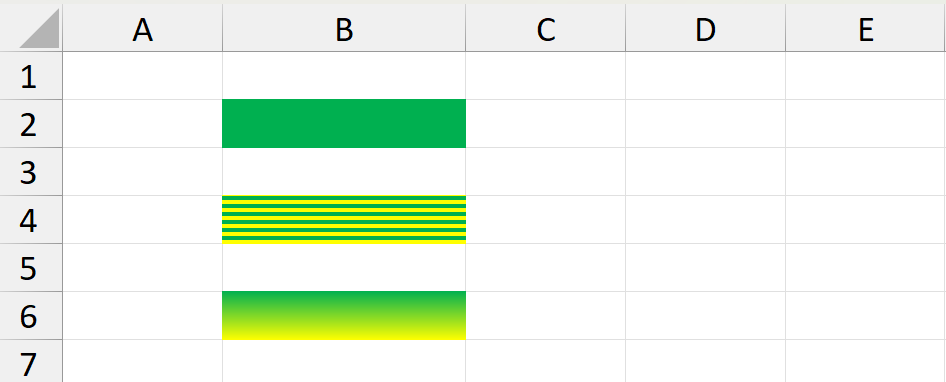
Using the CellStyle.FillPattern property, you can format the fill with a solid color, a pattern, or a gradient.
// A solid fill.
worksheet.Cells["B2"].Style.FillPattern.SetSolid(
    SpreadsheetColor.FromName(ColorName.Green));

// A two-color pattern fill.
worksheet.Cells["B4"].Style.FillPattern.SetPattern(
    FillPatternStyle.HorizontalStripe,
    SpreadsheetColor.FromName(ColorName.Green),
    SpreadsheetColor.FromName(ColorName.Yellow));

// A two-color gradient fill.
worksheet.Cells["B6"].Style.FillPattern.SetGradient(
    GradientShadingStyle.HorizontalHigh,
    SpreadsheetColor.FromName(ColorName.Green),
    SpreadsheetColor.FromName(ColorName.Yellow));
' A solid fill - the common case for a cell background.
worksheet.Cells("B2").Style.FillPattern.SetSolid(SpreadsheetColor.FromName(ColorName.Green))

' A two-color pattern fill.
worksheet.Cells("B4").Style.FillPattern.SetPattern(FillPatternStyle.HorizontalStripe, SpreadsheetColor.FromName(ColorName.Green), SpreadsheetColor.FromName(ColorName.Yellow))

' A two-color gradient fill.
worksheet.Cells("B6").Style.FillPattern.SetGradient(GradientShadingStyle.HorizontalHigh, SpreadsheetColor.FromName(ColorName.Green), SpreadsheetColor.FromName(ColorName.Yellow))
Align and wrap the content
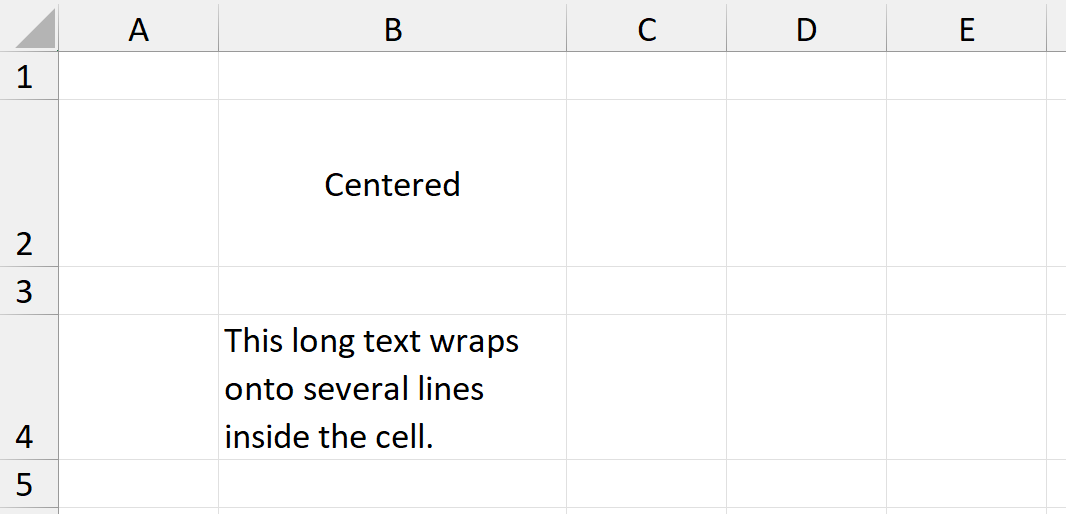
CellStyle.HorizontalAlignment and CellStyle.VerticalAlignment position the content within the cell, and CellStyle.WrapText breaks long text onto multiple lines.
// Center the content horizontally and vertically.
var cell = worksheet.Cells["B2"];
cell.Value = "Centered";
cell.Style.HorizontalAlignment = HorizontalAlignmentStyle.Center;
cell.Style.VerticalAlignment = VerticalAlignmentStyle.Center;

// Increase the width and height to make the centering visible.
worksheet.Rows[1].SetHeight(50, LengthUnit.Point);
worksheet.Columns[1].SetWidth(100, LengthUnit.Point);

// Wrap long text onto multiple lines inside the cell.
var wrapped = worksheet.Cells["B4"];
wrapped.Value = "This long text wraps onto several lines inside the cell.";
wrapped.Style.WrapText = true;
' Center the content horizontally and vertically.
Dim cell = worksheet.Cells("B2")
cell.Value = "Centered"
cell.Style.HorizontalAlignment = HorizontalAlignmentStyle.Center
cell.Style.VerticalAlignment = VerticalAlignmentStyle.Center

' Increase the width and height to make the centering visible.
worksheet.Rows(1).SetHeight(50, LengthUnit.Point)
worksheet.Columns(1).SetWidth(100, LengthUnit.Point)

' Wrap long text onto multiple lines inside the cell.
Dim wrapped = worksheet.Cells("B4")
wrapped.Value = "This long text wraps onto several lines inside the cell."
wrapped.Style.WrapText = True
Rotate and stack text
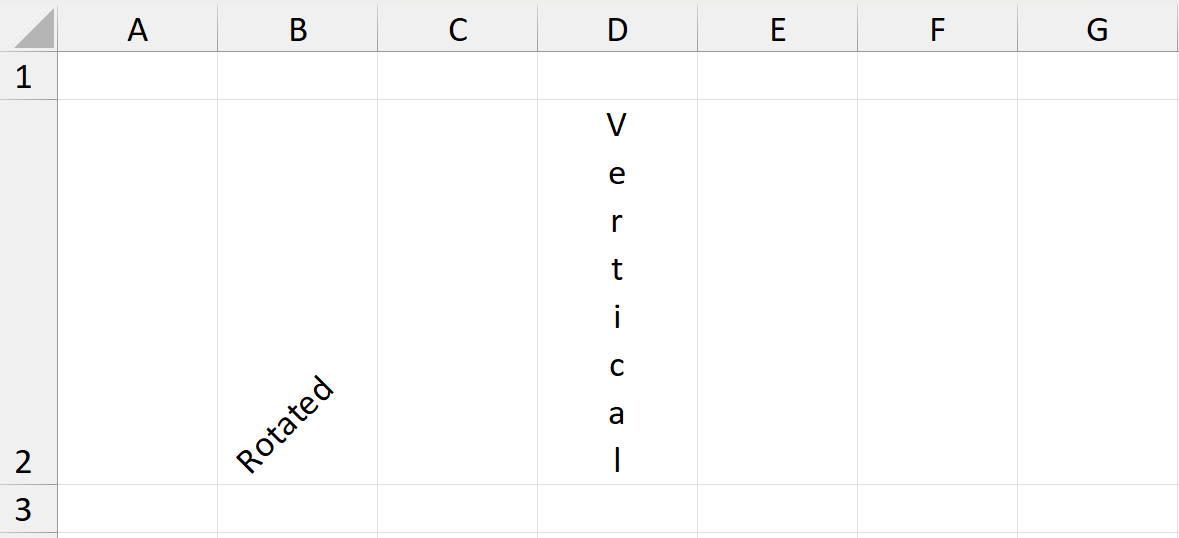
CellStyle.Rotation rotates the text by an angle from -90 to 90 degrees, while CellStyle.IsTextVertical stacks the letters from top to bottom.
// Rotate the text by an angle between -90 and 90 degrees.
worksheet.Cells["B2"].Value = "Rotated";
worksheet.Cells["B2"].Style.Rotation = 45;

// Stack the letters vertically.
worksheet.Cells["D2"].Value = "Vertical";
worksheet.Cells["D2"].Style.IsTextVertical = true;
' Rotate the text by an angle between -90 and 90 degrees.
worksheet.Cells("B2").Value = "Rotated"
worksheet.Cells("B2").Style.Rotation = 45

' Stack the letters vertically.
worksheet.Cells("D2").Value = "Vertical"
worksheet.Cells("D2").Style.IsTextVertical = True
Add and remove borders
You can define cell borders using the CellStyle.Borders.SetBorders method. This allows you to specify which borders to modify, along with their color and line style.
worksheet.Cells["B2"].Style.Borders.SetBorders(
    MultipleBorders.All,
    SpreadsheetColor.FromName(ColorName.Black),
    LineStyle.Thick);
worksheet.Cells("B2").Style.Borders.SetBorders(
MultipleBorders.All,
SpreadsheetColor.FromName(ColorName.Black),
LineStyle.Thick)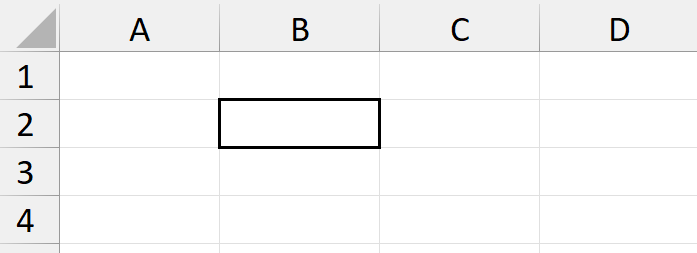
The first parameter of the SetBorders method specifies which borders are affected. For example, to remove the right border, use MultipleBorders.Right with LineStyle.None.
worksheet.Cells["B2"].Style.Borders.SetBorders(
    MultipleBorders.Right,
    SpreadsheetColor.FromName(ColorName.Black),
    LineStyle.None);
worksheet.Cells("B2").Style.Borders.SetBorders(
MultipleBorders.Right,
SpreadsheetColor.FromName(ColorName.Black),
LineStyle.None)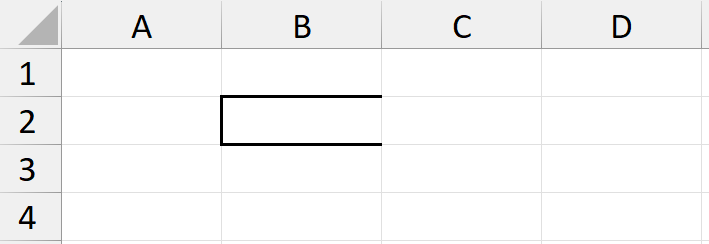
Built-in, custom, and default styles
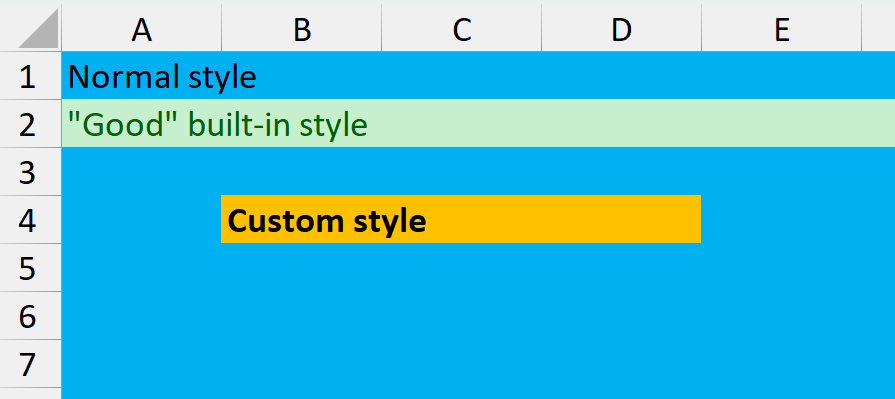
Instead of formatting each cell individually, you can format a Style instance and assign it to cells, rows, or columns. You can choose one of the following style types:
- Normal style - The default style available via the
ExcelFile.Styles.Normalproperty that every cell inherits. - Built-in, named style - One of the built-in styles listed in the
BuiltInCellStyleNameenumeration. - Custom style - A style with a custom name and formatting.
The following code examples show how to use all three types of styles and how to apply them to a row and a range of cells.
// Change the default style, which every cell inherits.
workbook.Styles.Normal.FillPattern.SetSolid(SpreadsheetColor.FromName(ColorName.LightBlue));

// Apply a built-in style to a whole row.
worksheet.Rows[1].Style = workbook.Styles[BuiltInCellStyleName.Good];

// Create a reusable custom style and apply it to a range.
var orangeStyle = workbook.Styles.Add("Highlight");
orangeStyle.Font.Weight = ExcelFont.BoldWeight;
orangeStyle.FillPattern.SetSolid(SpreadsheetColor.FromName(ColorName.Orange));
worksheet.Cells.GetSubrange("B4:D4").Style = orangeStyle;
' Change the default style, which every cell inherits.
workbook.Styles.Normal.FillPattern.SetSolid(SpreadsheetColor.FromName(ColorName.LightBlue))
' Apply a built-in style to a whole row.
worksheet.Rows(1).Style = workbook.Styles(BuiltInCellStyleName.Good)
' Create a reusable custom style and apply it to a range.
Dim orangeStyle = workbook.Styles.Add("Highlight")
orangeStyle.Font.Weight = ExcelFont.BoldWeight
orangeStyle.FillPattern.SetSolid(SpreadsheetColor.FromName(ColorName.Orange))
worksheet.Cells.GetSubrange("B4:D4").Style = orangeStyle
Work with colors
Every color - whether for the font, the fill, or a border - is an instance of SpreadsheetColor. There are three ways to make one:
- By name from the
ColorNameenumeration. - From RGB components.
- From a hex string.
// A theme color, by name.
worksheet.Cells["B2"].Style.Font.Color = SpreadsheetColor.FromName(ColorName.Red);

// A custom color, from RGB components.
worksheet.Cells["B4"].Style.Font.Color = SpreadsheetColor.FromArgb(0, 112, 192);

// A custom color, from a hex string.
worksheet.Cells["B6"].Style.Font.Color = SpreadsheetColor.FromArgb(0x8C001A);
' A theme color, by name.
worksheet.Cells("B2").Style.Font.Color = SpreadsheetColor.FromName(ColorName.Red)

' A custom color, from RGB components.
worksheet.Cells("B4").Style.Font.Color = SpreadsheetColor.FromArgb(0, 112, 192)

' A custom color, from a hex string.
worksheet.Cells("B6").Style.Font.Color = SpreadsheetColor.FromArgb(0x8C001A)
Related formatting topics
This example covers whole-cell formatting. A few related operations have their own articles:
- To format part of a cell's text differently, see Inline Text Formatting.
- To control how numbers, dates, and currency are displayed, see Cell Number Format.
- To format cells based on their value, see Conditional Formatting.
- To size rows and columns to their content, see Row and Column Autofit.
- To format merged cells, see Merge Cells.
Frequently asked questions
- How do I set the background color of a cell?
- How do I read back a cell's existing formatting?
- Why did applying a style erase my other formatting or a neighboring cell's border?
- How do I change the default font for the whole workbook?
- How do I copy formatting from one cell to another?
How do I set the background color of a cell?
There is no "background color" property - set the solid fill instead.
worksheet.Cells["B2"].Style.FillPattern.SetSolid(
    SpreadsheetColor.FromName(ColorName.Green));
worksheet.Cells("B2").Style.FillPattern.SetSolid(SpreadsheetColor.FromName(ColorName.Green))
How do I get a cell's existing formatting?
Read the formatting from the ExcelCell.Style property.
var fontName = worksheet.Cells["A1"].Style.Font.Name;
var horizontalAlignment = worksheet.Cells["A1"].Style.HorizontalAlignment;
Dim fontName = worksheet.Cells("A1").Style.Font.Name
Dim horizontalAlignment = worksheet.Cells("A1").Style.HorizontalAlignment
Why did applying a style erase my other formatting?
Assigning a brand-new CellStyle object to a cell replaces all of its formatting.
// Assigning a CellStyle object replaces all existing formatting with default values.
worksheet.Cells["B2"].Style = new CellStyle()
{
    HorizontalAlignment = HorizontalAlignmentStyle.Center
};

// Changing individual properties keeps existing formatting.
worksheet.Cells["B2"].Style.HorizontalAlignment = HorizontalAlignmentStyle.Center;
' Assigning a CellStyle object replaces all existing formatting with default values.
worksheet.Cells("B2").Style = New CellStyle() With {
.HorizontalAlignment = HorizontalAlignmentStyle.Center
}
' Changing individual properties keeps existing formatting.
worksheet.Cells("B2").Style.HorizontalAlignment = HorizontalAlignmentStyle.CenterHow do I change the formatting for the whole workbook?
Change the Normal style, which every cell inherits.
How do I copy formatting from one cell to another?
The ExcelCell.Style property has both a getter and a setter method, so you can take formatting from one cell and assign it to another cell.
// Copy a whole cell's formatting to another cell.
worksheet.Cells["B2"].Style = worksheet.Cells["A1"].Style;

// Or copy it to an entire range.
worksheet.Cells.GetSubrange("B4", "D4").Style = worksheet.Cells["A1"].Style;
' Copy a whole cell's formatting to another cell.
worksheet.Cells("B2").Style = worksheet.Cells("A1").Style

' Or copy it to an entire range.
worksheet.Cells.GetSubrange("B4", "D4").Style = worksheet.Cells("A1").Style